

pambazos88
-
Posts
155 -
Joined
-
Last visited
-
Days Won
2
Content Type
Profiles
TecmoBowl.org
Media Demo
Live Streams
Media
Twitch
Forums
Downloads
Everything posted by pambazos88
-
Does this apply to PR as well?, Or we still use this? http://tecmobowl.org/topic/7010-qb-and-punt-returner-ball-control/#p61757
-
This is just getting closer to perfection!!
-
http://tecmobowl.org/topic/11820-adding-stats-to-the-end-of-quarters/?hl=stats Yes, I think there are many IN-GAME-PLAYBOOK patches. I cant seem to find out where it came from but it was called main.nes, (the first version caused non-stop "beeping" and "jumbled" graphics, although it sure worked fine). I dont know why non of these versions exit the Playbook-menu with the B-button, like all of the other menus. Here is a patch that works with the "B-Button" : IN-GAME-PLAYBOOK B.rar Dokilen, when I wanted to make a 25-TEAMS ROM, The Raja helped me a lot. Maybe he can help you too, since you seem to be creating a Fantasy MOD as well. Here is a 24 TEAMS ROM based in his ROM (in which you can see more clearly what he modified) (It also has both, the IN-GAME-PLAYBOOK patch that Dusto pointed earlier, and the HALFTIME STATS): 24 Teams.nes
-
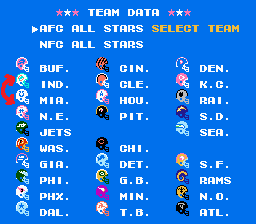
I dont know how to put ONLY the SELECTABLE MENUS (Preseason, Pro Bowl, Team Data, etc...) of your choice, but here is a way to REMOVE PRO BOWL: 1. At offset x3F9F4, is the NUMBER, that corresponds for the SELECTABLE Menus (in the Main MENU) For this example I only want the Main Menu to have: PRESEASON, SEASON GAME and TEAM DATA. So I only need 3 (input 03 at that offset). 2. Then at offset x3F9F5, are the cursor's coordinates (50, 60, 70, 80, 90) but I will only be needing the first 3 ones, so I will need to change ONLY the last 2 coords. that I am not using. I will then have, starting at offsetx3F9F5: 50, 60, 70, 70, FF 3. Finally at offset x200F3, INPUT: A4 88 .This will change the Menu from PRO BOWL to TEAM DATA (I dont want Pro BOWL, but I DO want TEAM DATA) Although PRO BOWL Menu will still be showing, YOU WILL NOT BE ABLE TO PLAY PRO BOWLS!! (instead you will open the TEAM DATA MENU) You will finally need to change the TEXTs from the Main MENU. To "reduce" the outlines: 1: at offset x1FA63 and x1FA67 are the numbers (originally 0B) that determine the lenght of the parallel vertical lines (reduce them by inputting 07) 2: at offset x1FA74 and x1FA77 are the numbers that determine the coordinates for the lower corners (input 04 and 12, instead of 84 and 92) 3: and at offset x1FA6A is the number for the coordinate for the bottom line (horizontal) (input 05 to move it up) In order to have your Menu looking like this: TSB NO PROBOWL.nes Since you wont be playing PRO BOWLS no longer, perhaps you would also want to remove ProBowl Teams from the TEAM DATA, although it is a little more complicated than removing a Team (because the Default First Team is exactly the AFC ALL Stars): 1. Go to offset x20AB9- x20ABB and input 4C 54 89 (this will not let you select the PRO BOWL TEAMS, so if you press the "A-button" it will do nothing until you select a Team) *THE CURSOR WILL STILL APPEAR ON THE DEFAULT POSITION, So you would want to remove it from there as well: 2. Go to offset x23B4D- x23B4E and input FF FF in order to make it "unreachable" (these are the cursor's coordinates for the AFC Stars) 3. go to offset x23B55- x23B56 and input FF FF (these are the coords. for the NFC Stars cursor ) THE CURSOR WILL STILL BE THERE, BUT YOU WILL NOT BE ABLE TO SEE IT ON THE SCREEN!, And since you have removed them from being "selectables", the A-button wont do anything, which will make perfect sense after you have REMOVED the AFC/NFC Stars TEXTS from there too. (TEXTS saying "AFC/NFC ALL STARS" are located at offset x1E91C) So now, whenever you open the TEAM DATA you will FIRST NEED TO MOVE THE DIRECTIONAL PAD to make the CURSOR APPEAR. I know this is not the best way to do it, but maybe it will help you.

-
I've been using YY-CHR since 2007 (and I dont see why I should change to another) From the TILE EDITOR's REVIEW at romhacking.org: Every game hacker has his own favorite Tile Editor, some are very easy to use, others really simplify each work, but since you will only be using some specific features to hack NES roms, look for an Editor that can: 1. Show ALL the graphic Tiles contained in the ROM, and 2. Allow Tile editing (Paint interface). Then again, most Tile Editors could be included within this description, But yy-chr Editor includes features such as: → Tile Selector (right button for multiple tile selection) → Clipboard Area (draw, color fill, rotate, flip, shift) → Editing Options (cut/copy-paste, undo, redo, save)** → Tile Table-Bank (Tile #) → Clipboard Zoom Tool (for editing 1x1, 2x2, 4x4, 8x8, 16x16 Tile Blocks) → Tile Visualization (ROM format and Pattern setup) → Scroll Bar (Graphic area) → Palette assignment (PREVIEW) (**Editing Options include: copy/paste tiles, from other roms and from bitmap images). And Tile Visualization can let you see different setups: Here you dont see shit!!: You just adjust your visualization to a 32x32 tile setup, and: There you go! The LOGOS!! Trust me on this one: YY-CHR sure makes it easier (I only need to know how to copy/paste)


-
Need help on mini helmets for an NCAA rom
pambazos88 replied to jjkaliff's topic in ROM Editing Discussion
Well thanks, coming from you, that is a real compliment! I forgot to mention, where are the LAST 4 MINI HELMET SETUP. The TILES are located starting at offset x3F6C3, but it has a different setup. Every 2 BYTES correspond to the UPPER part of those 4 Helmets. This means 3F6C3-3F6C4 belong to the 29th TEAM's UPPER HELMET, (3F6C5-3F6C6 belong to the 30th TEAM's UPPER HELMET, and so on until you reach byte at offset x3F6CB. From there Every 2 bytes correspond to the LOWER PART of the MINI HELMETS for those last 4 teams. But Every HELMET HAS A SPECIAL SETUP. (the 5th byte after the 4 graphic TILES). These SPECIAL SETUPs are allocated at offset x3F6D3. This is the 5th byte that assigns the SP-SETUP/palette. Taking your Rom again as an example: Input "01", to all 4 Special setups. (01= 2nd palette and NO SPECIAL TILES). But again, YOU WILL ONLY SEE THE ACTUAL CHANGES on the STANDINGS SCREEN. THE SETUP IS NOW ALRIGHT, the TILES- SETUP at least (assuming that for this example those 4 helmets were those colors). BUT THE PALETTE ASSIGNMENT FOR THE PRESEASON and the TEAM DATA are located where the rest of the Mini helmets are. This because those 2 screens were setup completely by all of their blocks. Then again, go to offset x425A (where the first palette of the block of helmets is located for the TEAM DATA). At offset x4270 is the palette for the 29th team. The 30th-31st Teams are a block, which palette is at x4278. And 32nd helmet's palette is at offset x4280. So, as an example, the last 4 helmets all were applied with a 2nd-Palette in their SETUP. So here you will apply that same palette too. Remember that the second palette is "55" for this particular area (that came from the binary: 01010101). Now you will have your TEAM DATA like this: That MATCHES correctly with the EXAMPLE-Special setup (as on the STANDINGS screen). Now just apply the 2nd-palette to your last 4 helmets on your PRESEASON/TEAM CONTROL. Do this at offsets x42B0, x42B8 and x42C0. In order to have all your screens with the same pattern:


-
Need help on mini helmets for an NCAA rom
pambazos88 replied to jjkaliff's topic in ROM Editing Discussion
Here is your rom (with some correct palettes): NCAA 2013_2copy3.nes BTW, you can check also some "UPDATED" LOGOS, I made for that COLLEGE ROM here: College.nes -
Need help on mini helmets for an NCAA rom
pambazos88 replied to jjkaliff's topic in ROM Editing Discussion
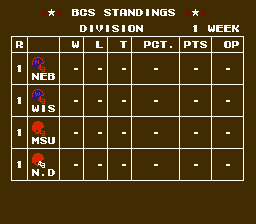
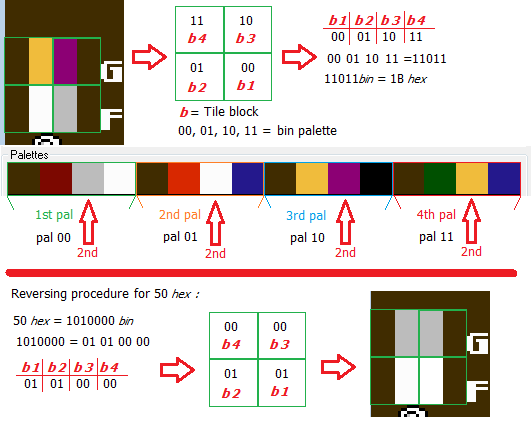
ALL MINI HELMETS HAVE THE SAME SETUP PROCEDURE "GRAPHICALLY", but the 32-team rom has a different palette assignement depending on the screen it is shown. For Example, for the second Helmet you want to modify, LOUISVILLE (24th team = or.Tampa Bay): So go to offset: x23c39, but this time you DO NOT need any special setup, since each part of the Louisville's helmet can be formed with the SAME PALETTE (palette00).and input the corresponding tiles which will form the graphic tiles from your helmet. Then input the 5th byte for the setup/palette): But you will see that helmet now is all Black& Yellow (eventhough you input the palette00). YOUR TILE SETUP IS CORRECT, dont worry, PALETTE ASSINGMENT DOES NOT APPLY THE SAME FOR ALL THE SCREENS SHOWING YOUR MINI HELMETS in a 32 TEAMS ROM. BUT HOW CAN YOU KNOW IF YOUR SETUP IS CORRECT??, just open your STANDINGS menu: (this screen has the correct setup) Now, having a correct setup on this screen. You will need to change the Palette assignment on the other screens showing the Mini-helmets (PRESEASON/TEAM CONTROL and TEAM DATA) These values are allocated starting at offset x425A. You will see a "50" at that offset. Again from dataSteve Tutorials, NES PPU Viewer can only apply 4 palettes to a Tile. (00), (55), (AA) or (FF) (hex:00 = 00000000:bin),(hex:55 = 01010101:bin),(hex:AA = 10101010:bin), and (hex:FF = 11111111:bin) So a "50" is "01010000:bin". To make a very simple explanation on this "binary" palettes by blocks(APPLIED FOR THIS PARTICULAR SECTION OF THE ROM): *ALWAYS MAKE an 8-bits-binary-palette (ADD ZEROS IN FRONT of the first bit, IF NECESSARY), First 2 bits (1byte) correspond to BLOCK #1, Second 2 bits (1byte) correspond to BLOCK #2.... BUT BLOCK#1 is the LOWER RIGHT BLOCK, BLOCK#2 is the LOWER LEFT BLOCK, BLOCK#3 is the UPPER RIGHT BLOCK and BLOCK#4 is the TOP LEFT BLOCK. Now for your Rom: go to offset x427C, and you will find "AA" (hex:AA = 10101010:bin) Which means the WHOLE block has the 10:bin palette assigned. You will need to change it to a 00:bin palette (because it contains the Red and White colors needed for your helmet). 00000000:bin = 00:hex, so input "00" at offset x427C. This has changed your helmet correctly (Team Data screen, at least), but you will need to modify the palette assigned for the PRESEASON screen. Go to offset x42BC and input 00 again. Now you have ALL SCREENS setup correctly.


-
Need help on mini helmets for an NCAA rom
pambazos88 replied to jjkaliff's topic in ROM Editing Discussion
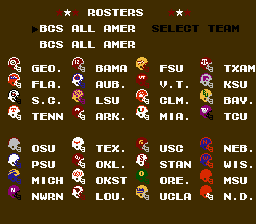
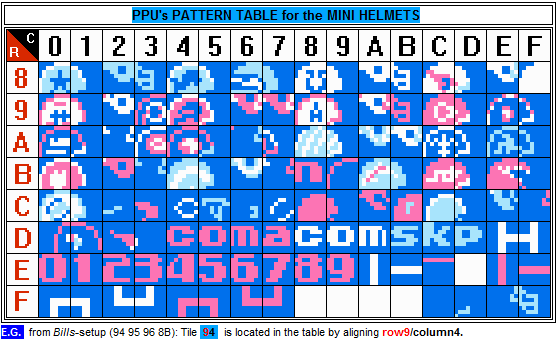
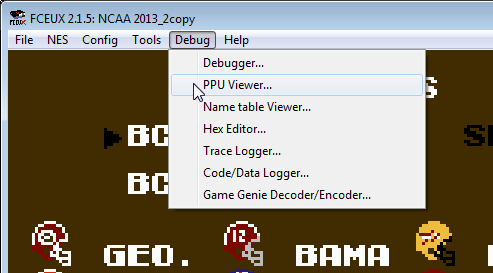
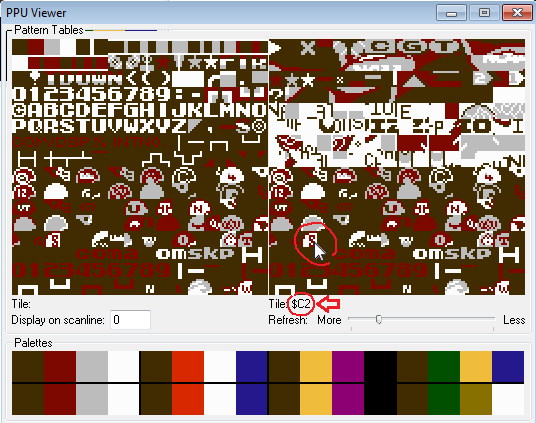
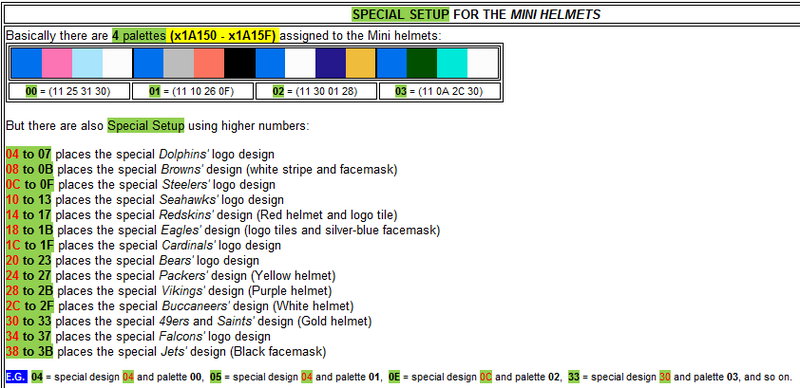
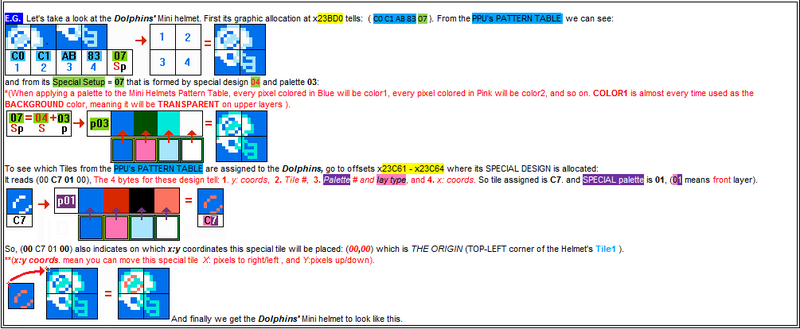
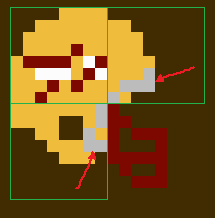
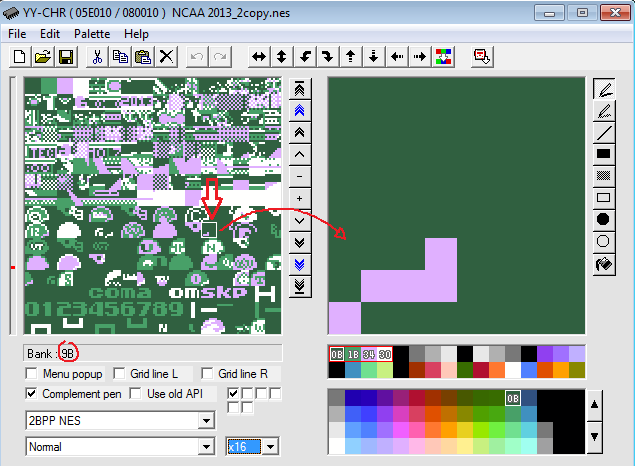
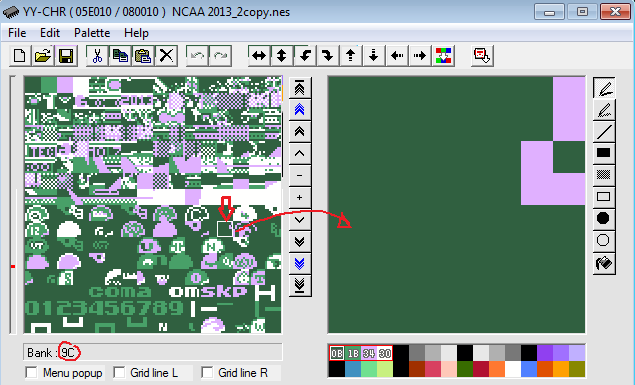
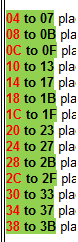
I will put some information in here, since I had the same problem when I first tried to make my College Rom. This will help when you want to modify the MINI HELMET TILES from a NES 32-base rom. MINI HELMETS are MAINLY shown on 3 screens: PRESEASON/TEAM CONTROL, TEAM DATA and NFL STANDINGS. The ORIGINAL 28-ROM had its MINI HELMET-TILES assignment at offset x23BC6, (32 teams rom as well, BUT only for the 28 first teams) In order to see this pattern TABLE, just open a TILE VIEWER program, (I reccommend YY-char, load rom into it and scroll down till you find the Mini helmets.) Another way is with the PPU Viewer feature, from the FCEUX emulator (>/Debug>/PPU viewer) Here, just roll your mouse over a tile you want to know its name, and its name will be shown in here. Now, at offset x23BC6 is allocated the first team's TILE-SETUP. EACH TEAM HAS A 5-BYTE-SETUP. THE First 4 bytes are for the GRAPHIC TILES that form the minihelmet onscreen. The last 5th Byte is to assign its SPECIAL-SETUP/PALETTE. To see how this SPECIAL SETUP ASSIGNMENT works. I WILL PUT THE EXAMPLE OF THE DOLPHINS HELMET (from dataSteve's tutorial). NOTE This Helmet only ADDS 1 SPECIAL GRAPHIC TILE. SOME OTHER SETUPS ADD THE WHOLE 4 TILES OVER/UNDER. IT ALL DEPENDS ON WHICH SETUP EACH TEAM HAS ASSIGNED TO THEM. So, to modify your FSU (Seminoles) and put it their RED FACEMASK, you will: First, locate the FSU Helmet setup (9th team =Steelers) which setup is allocated at x23BEE: B9 CB 82 83 2A (5 bytes). Here, you will see the special Setup byte (2A) YOU WILL HAVE TO CHECK WHAT DOES 2A STANDS FOR. HERE: (2A) means Sp-Setup 28 + Sp-palette 02 (28hex + 02hex = 2Ahex) Now, This means the $2A Special setup (or.the VIKINGS) is assigned in this ROM for the 9th team (or.the STEELERS) *A SPECIAL SETUP CAN BE ASSIGNED MORE THAN ONCE (different teams may have the same Sp-setup) So, go to offset x23CAD (where "2A" Special setup is located). YOU WILL NOTICE THIS IS a COMPLETE-4-TILE-SPECIAL-SETUP (so it is easier) REMEMBER: *The 4 bytes for these design tell: 1.(y: location coords), 2.(Tile #), 3.(Palette # and lay type), and 4.(x: location coords). 00 FD 00 00 TILE1 - "FD" 00 D1 23 08 TILE2 - "D1" 08 D1 23 00 TILE3 - "D1" 08 D1 23 08 TILE4 - "D1" but *23 means BACK LAYER/palette3 (But let's suppose you only had a 1-TILE-SETUP, you would then have to MOVE your x:y-coords, to those corresponding a TILE4=facemask, which are: x:y=08:08) but your Helmet still WONT MATCH EXACTLY ) Now, to add a RED FACE MASK to your FSU helmet (TILE4=facemask), go to the PPU viewer and locate a Tile having a RED FACEMASK. REMEMBER that ALMOST every PPU VIEWER Shows TILES applying the default (first) palette. For this particular example, the RED color happens to be a part of the 1st palette. If the facemask from FSU was PURPLE (2nd color from your 3rd palette), you would have to find a GRAY FACEMASK then (because Gray is the 2nd color from the DEFAULT palette). Or you can "click" the Right button from your mouse over the FCEUX's PPU VIEWER to switch from every palette available in there. The RED MASK is "A3" (Purple would be "87"), so at the Sp-setup-TILE4 from the 2A-Sp-setup (at x23CB9: 08 D1 23 08). Change the "D1" (corresponding the graphic tile) to "A3" (RED MASK), and change the "23"(BACK Layer/palette3) to "00" (front layer/palette00) You will end up having your FSU helmet like this: But as you can see part of the BlackMASK from the background layer is still there. (That would be all you could do if you had only a 1-TILE-SETUP, but since you have a complete-4-tile-setup, you can fix that). What you dont have, are the Tiles needed to add "THE REST" of the RED facemask. To see which tiles you are missing, I will add them, although they are not the correct color: RED=1st color from 1st palette: You just need to MAKE (CREATE/DRAW) those tiles (RED, 1st default color) and change them at their corresponding allocation (for TILE2, and TILE 3) which are these: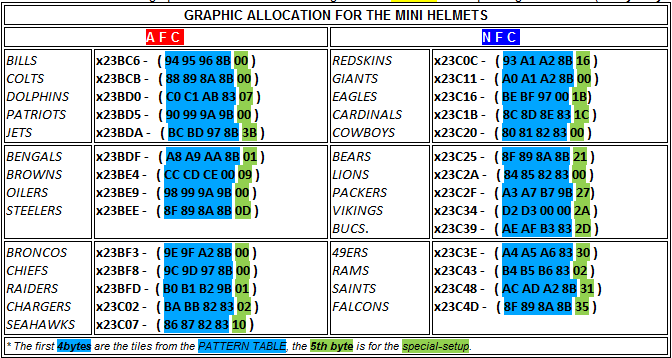


-
You didnt mention which Editor you are using. You could use another. And be sure you are selecting the "GO TO offset" feature. Some editors will ask you to enter an offset like this: 0x00002224B (all those zeros are necessary). And some others just need: 2224B
-
Drawing Routine for Intro (Montana, Barry , LT)?
pambazos88 replied to keithisgood's topic in Hacking Documentation
I dont know how you came with that so fast! You make it sound as if all of it was just "a walk in the park". Excellent job BTW! -
Drawing Routine for Intro (Montana, Barry , LT)?
pambazos88 replied to keithisgood's topic in Hacking Documentation
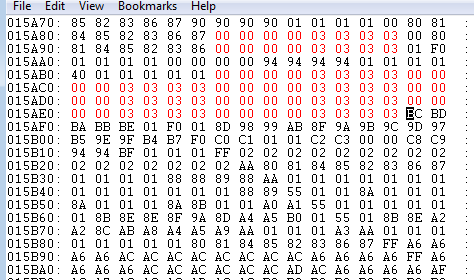
Are you talking about this screen? It has a BACKGROUND setup, so probably the palette is within the entire block.. at offset x15A70

-
Drawing Routine for Intro (Montana, Barry , LT)?
pambazos88 replied to keithisgood's topic in Hacking Documentation
Man U are a fucking artist!! I think that is awesome!! -
Introducing the Read Option to the Playbook
pambazos88 replied to Tecmonster's topic in ROM Editing Discussion
Maybe That happened because you changed the formation to SHOTGUN, but you forgot to change the TAKE SNAP command for the QB (D4 instead of D5) -
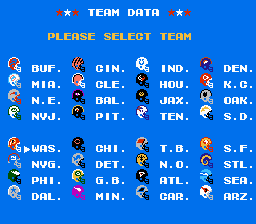
Oh, alright. I think that is a little easier. (Maybe Im wrong) You can use a TSB TOOL(SUPREME or I dont know...) and do the exact thing. SWITCH ALL THE TEAM DATA from team to team. (COPY-PASTE) That procedure in the above post, will only change the GRAPHICS on screen. Team's Data (NAMES, CITY, ROSTERS,etc.) needs to be changed this other way. I cant tell you if that will work because I dont know if all of the Team's data (SIM, FORMATIONS, UNIFORMS, etc.) will be selected. I'd like to think that EVERYTHING will be "swappd" (I have never done that b4)
-
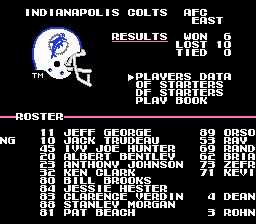
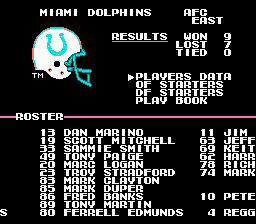
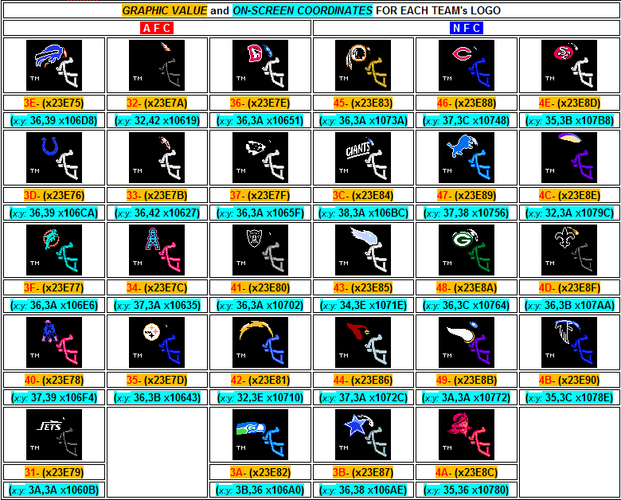
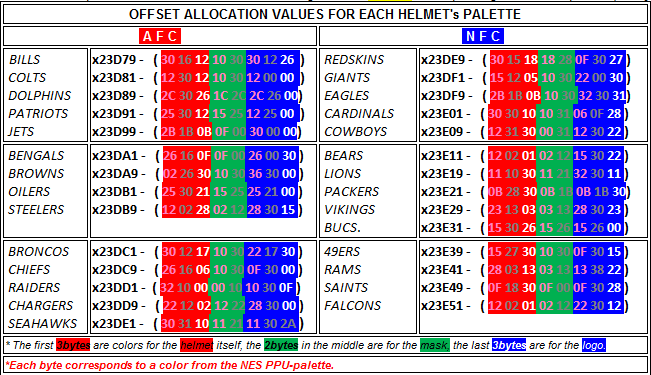
And for the BIG HELMETS: THE LOGO OF EACH TEAM HAS A NUMBER (and next to them is their Offset location) COLTS: 3D- (x23E76) DOLPHINS: 3F- (x23E77) Again, just SWITCH their LOGO values, and you'll have this: Then you will have to do the same for their palettes and SWITCH their COMPLETE Palette-SETUP (8bytes): COLTS: x23D81 - ( 12 30 12 10 30 12 00 00 ) DOLPHINS: x23D89 - ( 2C 30 26 1C 2C 2C 26 00) COLTS: x23D81 - ( 2C 30 26 1C 2C 2C 26 00) DOLPHINS: x23D89 - ( 12 30 12 10 30 12 00 00 ) Each helmet's palette has its allocation values starting at offset x23D79 corresponding to the Bills' palette (every 8 bytes is a TEAM, BUF-ATL Order),

-
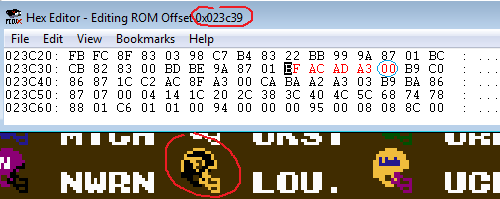
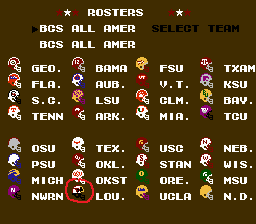
That is very simple to achieve, for the Original rom, but I dont know if you're familiar with HEX-EDITORs. You just have to "switch" their offset-tiles. You will need a HEX.editor. Here's how: for the MINI helmets: MINI HELMET TILES SETUP - ( x23BC6 - x23C51 ) Each Mini helmet has its graphic allocation values starting at offset x23BC6 corresponding to the Bills' (every 5 bytes is a TEAM, BUF-ATL Order), GRAPHIC ALLOCATION FOR THE MINI HELMETS A F C N F C BILLS x23BC6 - ( 94 95 96 8B 00 ) COLTS x23BCB - ( 88 89 8A 8B 00 ) DOLPHINS x23BD0 - ( C0 C1 AB 83 07 ) PATRIOTS x23BD5 - ( 90 99 9A 9B 00 ) JETS x23BDA - ( BC BD 97 8B 3B ) BENGALS x23BDF - ( A8 A9 AA 8B 01 ) BROWNS x23BE4 - ( CC CD CE 00 09 ) OILERS x23BE9 - ( 98 99 9A 9B 00 ) STEELERS x23BEE - ( 8F 89 8A 8B 0D ) BRONCOS x23BF3 - ( 9E 9F A2 8B 00 ) CHIEFS x23BF8 - ( 9C 9D 97 8B 00 ) RAIDERS x23BFD - ( B0 B1 B2 9B 01 ) CHARGERS x23C02 - ( BA BB 82 83 02 ) SEAHAWKS x23C07 - ( 86 87 82 83 10 ) REDSKINS x23C0C - ( 93 A1 A2 8B 16 ) GIANTS x23C11 - ( A0 A1 A2 8B 00 ) EAGLES x23C16 - ( BE BF 97 00 1B) CARDINALS x23C1B - ( 8C 8D 8E 83 1C ) COWBOYS x23C20 - ( 80 81 82 83 00 ) BEARS x23C25 - ( 8F 89 8A 8B 21 ) LIONS x23C2A - ( 84 85 82 83 00 ) PACKERS x23C2F - ( A3 A7 B7 9B 27) VIKINGS x23C34 - ( D2 D3 00 00 2A ) BUCS. x23C39 - ( AE AF B3 83 2D ) 49ERS x23C3E - ( A4 A5 A6 83 30 ) RAMS x23C43 - ( B4 B5 B6 83 02 ) SAINTS x23C48 - ( AC AD A2 8B 31 ) FALCONS x23C4D - ( 8F 89 8A 8B 35 ) * The first 4bytes are the tiles from the PATTERN TABLE, the 5th byte is for the special-setup. JUST SWITCH THE COMPLETE SETUP (5bytes) from one team to another to re-assign their positions on the screen. For example go to offset: x23BCB - ( 88 89 8A 8B 00 ) COLTS x23BD0 - ( C0 C1 AB 83 07 ) DOLPHINS and SWITCH their complete setup (copy-paste the 5 bytes) like this: x23BCB - ( C0 C1 AB 83 07 ) COLTS x23BD0 - ( 88 89 8A 8B 00 ) DOLPHINS HEX EDITOR's window then you will end up having your Mini helmet screen as this:

-
Drawing Routine for Intro (Montana, Barry , LT)?
pambazos88 replied to keithisgood's topic in Hacking Documentation
Now, just an OFF-TOPIC question. Do you have, by any chance the "values" (RS, RP, MS....) from this JJ WATT of your Rom?? And the real season stats.??? ( I mean, how many sacks/tackles he made last season) thx. -
Drawing Routine for Intro (Montana, Barry , LT)?
pambazos88 replied to keithisgood's topic in Hacking Documentation
For that specific scene (Lawrence) I think tiles are stored at offset x12ED8 and go on (I dont know if they are all "lined-up", but it seems they are. Just check the TILE# to find their coords. onscreen)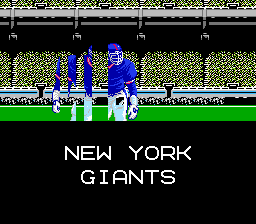
-
Introducing the Read Option to the Playbook
pambazos88 replied to Tecmonster's topic in ROM Editing Discussion
Well,it is not that simple.. First, I don't think the OPTION CODE provided by jstout is posted anywhere around here. I really wish he could POST it, or make a PATCH from it or something. PART OF IT (and some other stuff???) is contained in the OPTION DEMO, a link to that ROM is posted around here somewhere. (You can begin with that, I've tested on it many of xplozv's OPTION-PLAYS and all of them worked alright) Then, I added only 2 PLAYERS' commands (QB and RB2) to that OPTION DEMO. BUT this play is only "MAN-EXECUTABLE". YOU HAVE TO CHECK IF THEY DO THEIR "ASSIGNMENTS" AS WELL on COM COMMANDS. I didnt add any "COM-command" for this example, so don't expect COM will run this play correctly. (It will probably freeze or "wreck" your game). Bruddog's PLAY-MAKING GUIDE is "THE" TOOL you should "jump into" for this. (ALMOST EVERYTHING IS IN THERE) But, since you say you are pretty lost, HERE is a little explanation on how to use that guide: Let's say you wanted to change that SHOTGUN C DRAW (at the 4th slot in RUNS PLAYS) with a brand NEW PLAY you've came up with (A QB READ OPTION): So the first thing you should do is check where this "SHOTGUN DRAW" has its data allocated in the ROM. If you ever checked the feature "FIND_TEXT" on a HEX-EDITOR you would also see where the next info. came from. at offset x1D410 it reads: "T FAKE SWEEP R" on the TEXT Window of your HEX EDITOR, (rightmost columns) that is where you have to start changing PLAY POINTERS. If you scroll down a bit you would also find the offset corresponding the "SHOTGUN C DRAW". Bruddog mentions in his guide that 15 bytes are for the NAME, the next 1 byte corresponds to the FORMATION, and the next 8 bytes are for the PLAY REACTION POINTERS (1 for each possible DEF. selection: U+A, L+A, R+A, D+A, U+B, L+B, R+B, D+ So starting at offset x1D6E0 you will see the complete "SHOTGUN C DRAW" PLAY LISTING: 53 48 4F 54 47 55 4E 20 43 20 44 52 41 57 20 11 58 58 58 58 58 58 2C 2C All of these PLAYS should have 24 bytes 53 48 4F 54 47 55 4E 20 43 20 44 52 41 57 20 11 58 58 58 58 58 58 2C 2C S H O T G U N _ C _ D R A W _ FORMATION and REACTION(PLAY#) NAME bytes are self-explanatory, FORMATION is for the different play formations (Onesetback, Shotgun A, shotgun B, No back, etc.. also explained in that guide) and the PLAY# (REACTION) which is probably the most important part of this guide, indicates (with a number) which Play will be run. EACH PLAY HAS A NUMBER (PLAY#), corresponding a "unique" Of. reaction based on the DEF. selected. The PLAY NUMBERS for the SHOTGUN C DRAW are #58, and # 2C. This is where bruddog's guide comes in real handy. You just have to look where PLAYS #58 and #2C have their COMMAND POINTERS setup. The guide shows: PLAY #2C - x47D8 SHOTGUN C DRAW (ALT) EBB0 C3AC F2B0 C9AC CFAC D5AC 99BE DBAC BBBE CABE D9BE PLAY #58 - x4BA0 SHOTGUN C DRAW EBB0 A5B7 F2B0 B4B7 B9B7 BEB7 99BE DBAC BBBE CABE D9BE But what these bytes stand for? They are the POINTERS for EACH PLAYER's COMMANDS.(2bytes per OF starter, 11 pairs of bytes) Their order is just as the order in the OF STARTERS MENU: QB RB1 RB2 WR1 WR2 TE C LG RG LT RT (In other words you can just focus on "reading" a single player's command at a time, depending on his position on the field) So for the PLAY #58 (Guide says pointers for this PLAY start at offset x4BA0): EBB0 A5B7 F2B0 B4B7 B9B7 BEB7 99BE DBAC BBBE CABE D9BE QB RB1 RB2 WR1 WR2 TE C LG RG LT RT You can then focus only on the COMMAND performed by the QB. His POINTERS are found within the first pair of bytes on that PLAY#58 : "EBB0" ONLY KNOWING THAT THESE ARE ALL POINTERS, you can actually tell where do they POINT. In this particular section of the ROM, OFFENSIVE PLAY POINTERS direct to an offset by: 1. "switching" position from the pointer's pair of bytes. "EB B0" you will end up with: "B0 EB" 2. "substract" 2000 to this value you've just obtained: B0EB- 2000 = "90EB" (with the help of a HEX/scientific calculator of course) 3. "add" 10 to this value you just got: 90EB + 10 = "90FB" 4. This is actually the offset where this POINTER indicates to a direction ...x90FB So, at offset x90FB are the COMMANDS that the QB will follow for PLAY#58. Go to that offset and it says: D5 F31E 72 FF32B8 IN ORDER TO READ (and understand) THIS COMMANDS YOU MUST FIRST HAVE ANOTHER TOOL: jstout's COMMAND LIST DOCUMENT it indicates: xD5 = Take Snap from Shotgun. xF3 = Stand (Time)... (Time) = each x14 is a second and x00 is forever xF31E = Stand (1.5 sec.) x70 to x7A = Pitch to Player# x72 = Pitch to Player # 2 xFF = Jump To (Pointer)... (Pointer) = Lo Byte and Hi Byte for a pointer xFF32B8 = Jump/GO To OFFSET x9842 (got offset direction from the above procedure) Now, the difficult part of this, is reading ALL OF THE COMMAND data correctly. But "interpreting" the above command, it sounds like the "LOGIC" any QB would follow in a SHOTGUN DRAW (First part at least. The COMMAND is "CUT" with that "jump", and continues at offset x9842..) I am not good at "reading into" these commands anyway, so I cannot help you with it that much, But all of their meanings are within that COMMAND LIST TOOL and you will end up "reading" almost any player's command with its help. There are some things You really need to keep in mind all of the time: OFFENSIVE PLAYS LISTINGS: x1D410 to x1DA0F (24 bytes per play) OFFENSIVE FORMATION POINTERS: x4010 to x41F3 (Each formation is 11 pointers) OFFENSIVE REACTION POINTERS: x4410 to x4BF7 (Each play is 11 pointers) OFFENSIVE COMMAND SECTION: x8010 to xA00F In my READ OPTION EXAMPLE, When I wanted to "assign" another command to my QB, I just re-assigned (redirected) the QB's POINTERS for PLAY#58. Originally PLAY#58 (SHOTGUN DRAW) has its pointers located at x4BA0, where it says: EBB0 A5B7 F2B0 B4B7... The first pair of bytes is for my QB's COMMAND pointers. So I changed that pointer (EBB0) to 80BF because I knew offset x9f90 was "EMPTY SPACE" (BLANK-data area). This way any other Command would remain intact and I could start from scratch with my QB's Command. [for pointer 80BF: 1.BF80, 2. BF80- 2000 = 9F80, 3. 9F80 + 10 = 9F90, 4.points to offset x9F90] So, after changing the QB's pointer for PLAY #58 (at x4BA0) with the NEW POINTER 80BF you can begin your NEW COMMAND for your QB's NEW PLAY (THE READ OPTION) just by inputting it to its "NEW pointed direction" at offset x9f90. I already knew xplozv's COLLEGE DEMO had some READ OPTION PLAYS in it, so I just had to find out where the COMMANDS for the QB were setup in any of those and "emulate" one. Again, you may wanna go first to its OFFENSIVE PLAYS LISTINGS, then check out which PLAY# correspond to that particular play. With that number, then go to bruddog's PLAY-MAKING document and find that PLAY# in there. Then check the OFFENSIVE REACTION POINTERS by player and finally "read" their assignment in the OFFENSIVE COMMAND SECTION. After that, you would find some of the QB's commands for your READ OPTION. I found this one and I just made it fit to my needs: QB COMMAND for the READ OPTION: D5 1206 DE0001 D8F008 FF5ABE THIS COMMAND YOU CAN WRITE IT OVER AT OFFSET x9f90 (where your NEW QBpointer "points" now) Reading this QB COMMAND taken from xplozv's DEMO (with the help of the COMMAND LIST TOOL: D5 1206 DE0001 D8F008 FF5ABE xD5 = Take Snap from Shotgun x1P-x0X = READ OPTION Handoff, where x10=Qb, x11=Rb1, x12=Rb2, etc., and x00 =0% , x01=6%, x02=13%, and x10 = 100% etc. chance of keeping (00-0F) xDE (Location) = MAN/COM Control on path if player is ball carrier xD8 = Move-Ball Placement (Location) xFF = Jump To (Pointer) What I Understand from this is: D5-QB receives the football from a SHOTGUN center. 1206- then READ OPTION takes place, QB's option is with PLAYER#2 (RB2), ( 06 is the chance of keeping it, around 38% BUT THIS IS COM READING). DE0001- is the "PATH" in which the QB is being able to "OPTION-the-Handoff" (0001 means it is a really short path almost "non-existent"). IF YOU WANT YOUR QB TO STAND AND KEEP THE BALL, YOU SHOULD KEEP THE A-BUTTON PRESSED ALL THE TIME, until he "enters" this path. D8F008- I dont get this command right, sorry. And FF5ABE- it is another pointer to follow a command. Many QB plays end up with this "jump", so I just added that pointer (5ABE) to it. BUT PLAY IS STILL INCOMPLETE, of course the RB2 command is not added still, well it is up to you to complete it. Hopefully I've made myself clear with all of this, But the best way you will get how this works is by testing some commands yourself. -
Introducing the Read Option to the Playbook
pambazos88 replied to Tecmonster's topic in ROM Editing Discussion
You should start by checking the COLLEGE DEMO by xplozv. He made a "complete" playbook including a couple READ OPTIONS (w/PASS), PLAY ACTION, 3PLE OPTION (the way the original "FAKE SWEEP" should have been played from the start..) Here's an example of a QB Read OPTION (taken from a play in that COLLEGE ROM by xplozv) It is in the 4th RUN SLOT, (instead of the or. SHOTGUN DRAW) In order to understand what you are doing, you should probably need the PLAYHACKING GUIDE (I cant seem to find anything with the search button sorry, but here is another post referring to that same guide http://tecmobowl.org/topic/854-how-to-modify-actual-plays-routes-blocking-etc/) There you will find: SHOTGUN C DRAW 11 58 58 58 58 58 58 2C 2C (11- is the formation) ( 58 and 2C are the reactions based on each selected defense) Im only going to modify the 58-reaction, so PLAY #58's POINTERS are allocated at x4BA0: EBB0 A5B7 F2B0 B4B7 B9B7 BEB7 99BE DBAC BBBE CABE D9BE These are the pointers for each of the 11 of. players on field starting with the QB: EBB0 A5B7 F2B0... ( QB RB1 RB2...) RE-Direct their commands to: 80BF A5B7 90BF 80BF re-directs to offset x9F90, (obtained by switching 80BF bytes: BF80, substracting 2000 in hex, and adding 10 in hex) Here will be the NEW COMMANDS FOR THE QB and 90BF points to offset x9FA0 . Here will be the NEW COMMANDS FOR THE RB2 (SINCE ONLY THOSE 2 PLAYERS WILL TAKE CONTROL OF THE BALL: QB and RB2) AT x9F90, will be the setup for the QB commands for the READ OPTION: D5 1206DE0001 D8F008 FF5ABE ,where: xD5 = Take Snap from Shotgun xDE = HANDOFF/QB ... prefix x12 = 2 is the RB2...... To read this commands go here: http://tecmobowl.org/topic/10528-nes-play-design-info/ and AT x9FA0 will be the setup for the RB2 commands for the READ OPTION: F31C D820D0 D80AE0 DEFE02 FF60BE *THESE COMMANDS WERE "PARTIALLY" TAKEN FROM THE COLLEGE DEMO, NONE of the COM commands in there were applied here, so this is only a MAN-playable command. You can input (and modify) them in order to see how the COM plays this READ OPTION. ALL CREDIT TO JSTOUT AND XPLOZV ** of course YOU HAVE TO INPUT THE OPTION CODE (made by jstout) FOR ALL OF THIS TO WORK ... I only had the OPTION DEMO, (has a lot of bugs because NONE of the other plays were modified on their commands) It works this way: When choosing the QB READ OPTION, Defense will call a play as well, if DF chooses D+B, or R+B OFFENSE REACTION will be 2C, so QB READ OPTION PLAY WILL NOT TAKE PLACE, instead it will continue with the original SHOTGUN DRAW commands. But if any other defense is called, Offense will react with the play #58, so PLAYER (MAN) will choose if he hands-off to the RB2, or if his QB will "stand" and keep the ball (by pressing the A-button BEFORE he gives the football to the RB2) Here is the file OptionDEMO-c.nes
-
There are other "rare BLUE" animations all around. Like the one from the SCROLLING MID FIELD LOGO (at 0x2C149) or the one from the LEFT GOAL POST animation (at 0xC760) It doesnt make any sense that they are apart from their context
-
I dont know if you mean this screen, that changes this blue: That BLUE is located at offset x1AE7D But yes somewhere in that thread it says:If you go to offset x2ed43 (value 1A) I think it controls other animations, but you can explore that data-area The "READY!" scene before Montana is affected by this (I dont remember what else..)
-
changing a team's offensive formation
pambazos88 replied to Tecmonster's topic in Hacking Documentation
I also cant find that post where this information was added. But in the Hacks Directory it is this one http://tecmobowl.org/topic/1709-changing-formations/ But it is still about a 28 TEAMS mod -
changing a team's offensive formation
pambazos88 replied to Tecmonster's topic in Hacking Documentation
OF FORMATIONS SETUP Each Team has an Offensive formation depending on the position of their BACKS on the field: 3 WR: 1 Rb / 3 Wrs / 1 TE - (Chargers, Redskins, Cardinals) 4 WR: 1 Rb / 4 Wrs - (Oilers, Lions, Falcons) PRO: 2 Rbs/ 2 Wrs / 1 TE - (All of the rest) Chargers x21647 (0C)*, Redskins x2164B ,0x31007 (0E)*, Cardinals x2164F, 0x3100B (11)* *Changing to a differtent Team's number at this offset, will make this team have a 3 WR formation ( team 00=BUF, 1B=ATL) Oilers x21654, x30FFB (07)** Lions x21658, x30FFF (14)** Falcons x2165C, x31003 (1B)** *Changing to a differtent Team's number at these offsets, will make this team have a 4 WR formation ( team 00=BUF, 1B=ATL) OR YOU CAN CUSTOMIZE EVERY TEAM by entering the code provided by jstout: At x21642 input: 8AA66EBCD09FAA4C5096 * (this will redirect to TEAMS' FORMATION at x21FE0) At x21FE0 it will be the new FORMATION SETUP for the Teams in BUF-ATL order. (00=pro, 01=4wr, 02=3wr-1te) Here you have to input 28 values (+ 2 for All-PROs) At x30FF8 input: 8AA66EBC709EAAC001F011C002F0134CFE8F * (this will redirect to x31E80, where PLAYERS' POSITION (WR,RB,TE) is assigned for the NEW FORMATION ) At x31E80 it will assign the CORRECT position for each new FORMATION SETUP. BUF-ATL order. (00=pro, 01=4wr, 02=3wr-1te).Here you also have to input 28 values (+ 2 for All-PROs)